Land Registry Integration - Document Registration Template Set-up (Administrators)
The electronic document registration option triggers the
implementation of the Land Registry electronic document registration service (eDRS).
Land Registry’s electronic Document Registration Service (eDRS) provides a
faster and more cost-effective way for customers to submit and receive
applications. Using eDRS, customers can submit a range of applications
electronically that could previously only be lodged through paper-based
methods.
Templates
To make the eDRS process simpler, the system can be
configured to have pre-existing scenarios. These allow the user to
pre-configure required documents and party roles, which can then be selected
from the main eDRS form.
The template covers the main defaults for raising an eDRS
submission:
- General – covers the basic application information, such as the registration type, expected fee value (from a token) and what the application affects (whole/part).
- Documents – select the documents that are normally associated with this type of application. These can be both application and supporting documents.
- Client Roles – defines what roles the client will take on the application, and who would normally represent them on the application.
- Party Roles –defines what roles the buyer/seller will take on the application, and who would normally represent them on the application.
- Other Parties – defines who, from the other parties list, would normally be involved in the application and what their roles in the application would normally be.
- Permissions – defines if the application can only be submitted by a fee earner. The application can be filled in by any user but defining this means that it needs to be reviewed by a fee earner in order to be submitted.
To add a New template
Select Add at the top of the right-hand section. In the Window which then opens:
1. Give your template a name, in the below example we are using Transfer with Charge and Discharge
1. Give your template a name, in the below example we are using Transfer with Charge and Discharge
2. Select the correct Registration Type
3. Enter the token(s) you would like for your reference by clicking the Insert button, then the Token option at the bottom of the list, and find the token(s) in the same way as you would when adding the reference to a letter template
4. Expected Fee - this should be linked to the correct Cost Table listing for the Land Reg fees. Please ensure these are up to date with the latest fees and any variables (for example Transfer of Part) are also selected correctly. The token you choose should be 'Evaluated Value'
5. Set the correct Application Affects choice
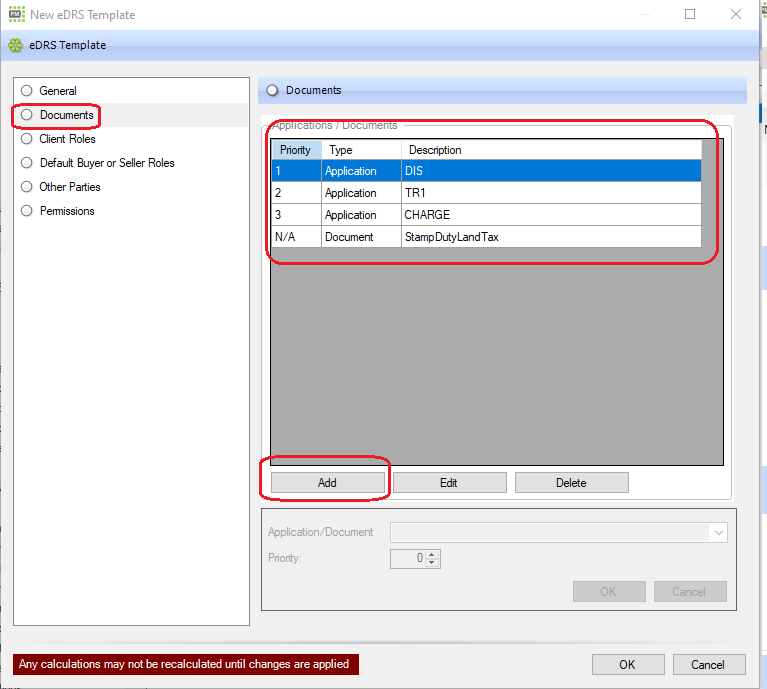
6. Click on Documents
Again the example below shows the standard defaults for Transfer of Whole with Charge and Discharge but you should ensure you are selecting the document list on each different template correctly. Note, when adding the Application documents, try to do so in the order of priority as these get set automatically when adding them for the first time. You can edit them after adding if you have not done this in the correct order:
1. Click Add, Select if it is an Application or a Document.
2. Select the correct item from the drop-down list and say ok to add it.
3. Repeat until all standard required application or supporting documents are showing in the list
4. Click on Client Roles:
In the client roles area, this is where you set the defaults advising what relationship your client has to each of the Application documents and also the Client representation - select each from the drop downs provided in each one. Again, please note the examples below are specific to the example type already advised above and you should ensure your selections are correct when setting them up. Then click on 'Default Buyer or Seller Roles':
In the Default Buyer or Seller Roles this is where you set the defaults advising what relationship the Buyer or Seller has to each of the Application documents and also their representation - select each from the drop downs provided in each one. Again, please note the examples below are specific to the example type already advised above and you should ensure your selections are correct when setting them up. Then click on 'Other Parties':
In the Other Parties area this is where you set the defaults advising what relationship the (e.g) Lender(s) have to each of the Application documents and also their representation - Tick the type of Other Party to always add as a default and then select each from the drop downs provided in each one. Again, please note the examples below are specific to the example type already advised above and you should ensure your selections are correct when setting them up. Then click on 'Permissions' if you wish to only allow certain Users access to these templates, mostly though you will click on 'OK' to save your template in the list:
Permissions - set these if you need to limit these to Fee Earners only but the default is to allow all users access:
Say OK and your new template will appear in the list:

If you found this article useful, please "Like" it using the thumb below, it really helps us to know which articles are the most useful to you!
Related Articles
Land Registry Integration - Document Registration
In order to integrate with the Land Registry to order searches/documentation, each user will need to have their login details entered in Redbrick either in their User set-up area by one of your firm's Administrators, or in V28 and above, within the ...Land Registry Integration - OS1/OS2
In order to integrate with the Land Registry to order searches/documentation, each user will need to have their login details entered in Redbrick either in their User set-up area by one of your firm's Administrators, or in V28 and above, within the ...Land Registry Integration - Bankruptcy Search
The Bankruptcy Search option implements the Land Registry Bankruptcy Search (K16) through integration with Redbrick. Each user must have their Land Registry login details entered in Redbrick, either in their user setup area by an Administrator within ...Land Registry Integration - Registered Proprietor Service Title Check
In order to integrate with the Land Registry to order searches/documentation, each user will need to have their login details entered in Redbrick either in their User set-up area by an Administrator in your firm, or (in V28 and above) within the 'My ...Land Registry Integration - Register Search
In order to integrate with the Land Registry to order searches/documentation, each user will need to have their login details entered in Redbrick either in their User set-up area by an Administrator in your firm, or (in V28 and above) within the 'My ...